Tạo SAM pipeline
Tạo SAM Pipeline với nhà cung cấp là CodePipeline sẽ có 3 bước riêng biệt sau:
- Tạo cơ sở hạ tầng và IAM roles cần thiết
- Tạo mẫu CloudFormation pipeline
- Triển khai mẫu CloudFormation pipeline SAM Pipeline sẽ tự động hoá tất cả các bước trên.
Tạo cơ sở hạ tầng và IAM roles cần thiết
- Chạy câu lệnh sau:
sam pipeline init --bootstrap
- Trả lời các câu hỏi với theo danh sách dưới đây:
- Select a pipeline template to get started: AWS Quick Start Pipeline Templates (1)
- Select CI/CD system: AWS CodePipeline (5)
- Which pipeline template would you like to use? (1)
- Do you want to go through stage setup process now? [y/N]: y
- [1] Stage definition. Stage configuration name: dev
- [2] Account details. Select a credential source to associate with this stage: default (named profile) (2)
- Enter the region in which you want these resources to be created: Your region of choice
- Enter the pipeline IAM user ARN if you have previously … [] return/enter
- Enter the pipeline execution role ARN if you have previously … []: return/enter
- Enter the CloudFormation execution role ARN if you have previously … []: return/enter
- Please enter the artifact bucket ARN for your Lambda function. If you do not … []: return/enter
- Does your application contain any IMAGE type Lambda functions? [y/N]: N
- Press enter to confirm the values above … : return/enter
- Should we proceed with the creation? [y/N]: y
sam pipeline init generates a pipeline configuration file that your CI/CD system
can use to deploy serverless applications using AWS SAM.
We will guide you through the process to bootstrap resources for each stage,
then walk through the details necessary for creating the pipeline config file.

Please ensure you are in the root folder of your SAM application before you begin.

Select a pipeline template to get started:
        1 - AWS Quick Start Pipeline Templates
        2 - Custom Pipeline Template Location
Choice: 1

Cloning from https://github.com/aws/aws-sam-cli-pipeline-init-templates.git (process may take a moment)
Select CI/CD system
        1 - Jenkins
        2 - GitLab CI/CD
        3 - GitHub Actions
        4 - Bitbucket Pipelines
        5 - AWS CodePipeline
Choice: 5
Which pipeline template would you like to use?
        1 - Two-stage pipeline
        2 - Two-stage pipeline with monorepo
Choice []: 1
You are using the 2-stage pipeline template.
 _________    _________
|         |  |         |
| Stage 1 |->| Stage 2 |
|_________|  |_________|

Checking for existing stages...

[!] None detected in this account.

Do you want to go through stage setup process now? If you choose no, you can still reference other bootstrapped resources. [y/N]: y

For each stage, we will ask for [1] stage definition, [2] account details, and [3]
reference application build resources in order to bootstrap these pipeline
resources.

We recommend using an individual AWS account profiles for each stage in your
pipeline. You can set these profiles up using aws configure or ~/.aws/credentials. See
[https://docs.aws.amazon.com/serverless-application-model/latest/developerguide/serverless-getting-started-set-up-credentials.html].


Stage 1 Setup

[1] Stage definition
Enter a configuration name for this stage. This will be referenced later when you use the sam pipeline init command:
Stage configuration name: dev

[2] Account details
The following AWS credential sources are available to use.
To know more about configuration AWS credentials, visit the link below:
https://docs.aws.amazon.com/cli/latest/userguide/cli-configure-files.html
        1 - Environment variables (not available)
        2 - default (named profile)
        3 - produser (named profile)
        q - Quit and configure AWS credentials
Select a credential source to associate with this stage: 2
Associated account 885078239936 with configuration dev.

Enter the region in which you want these resources to be created [ap-southeast-1]: ap-southeast-1
Enter the pipeline IAM user ARN if you have previously created one, or we will create one for you []:

[3] Reference application build resources
Enter the pipeline execution role ARN if you have previously created one, or we will create one for you []:
Enter the CloudFormation execution role ARN if you have previously created one, or we will create one for you []:
Please enter the artifact bucket ARN for your Lambda function. If you do not have a bucket, we will create one for you []:
Does your application contain any IMAGE type Lambda functions? [y/N]: n

[4] Summary
Below is the summary of the answers:
        1 - Account: 885078239936
        2 - Stage configuration name: dev
        3 - Region: ap-southeast-1
        4 - Pipeline user: [to be created]
        5 - Pipeline execution role: [to be created]
        6 - CloudFormation execution role: [to be created]
        7 - Artifacts bucket: [to be created]
        8 - ECR image repository: [skipped]
Press enter to confirm the values above, or select an item to edit the value:

This will create the following required resources for the 'dev' configuration:
        - Pipeline IAM user
        - Pipeline execution role
        - CloudFormation execution role
        - Artifact bucket
Should we proceed with the creation? [y/N]: y
        Creating the required resources...

Checking for existing stages...
Sau khi hoàn tất, bạn sẽ thấy đầu ra giống như sau:
Successfully created!
The following resources were created in your account:
        - Pipeline IAM user
        - Pipeline execution role
        - CloudFormation execution role
        - Artifact bucket
Pipeline IAM user credential:
        AWS_ACCESS_KEY_ID: AAAAAAAAAAAAIFRDVPDX
        AWS_SECRET_ACCESS_KEY: xxxxxxxxxxxxxxxxxxxxxxkMYI9RatNgVcIybUwh
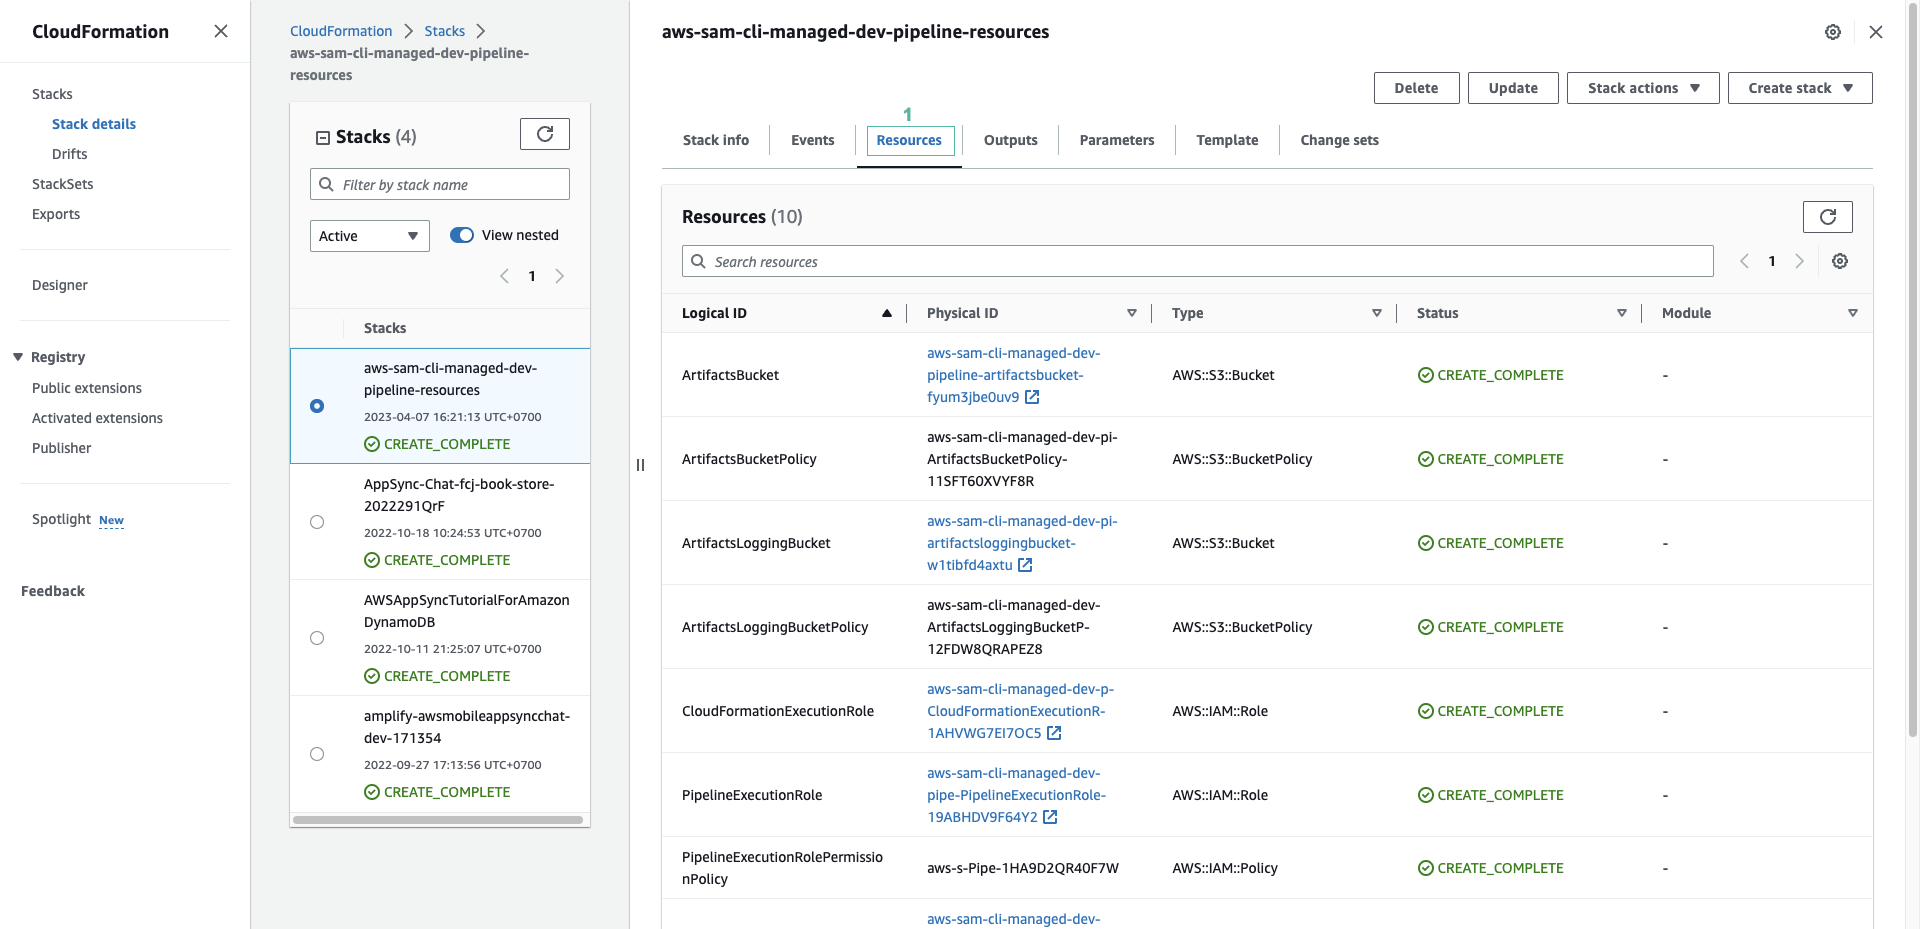
- Mở bảng điểu khiển của CloudFormation

- Ấn Stacks ở menu phía bên trái để kiểm tra xem stack đã được tạo chưa.
- Ấn vào stack đang hiển thị

- Ấn sang tab Resources, các tài nguyên đã được khởi tạo
- Quay lại với màn hình tạo SAM pipeline
- Nhập “N” để không tạo stage thứ 2.

Tạo mẫu CloudFormation pipeline
Chúng ta tiếp tục tạo mẫu CloudFormation xác định toàn bộ CI/CD pipeline
- Nhập các câu trả lời theo dánh sách dưới đây
- What is the Git provider? Choice []: CodeCommit (2)
- What is the CodeCommit repository name?: fcj-book-store-backend
- What is the Git branch used for production deployments? [main]: main
- What is the template file path? [template.yaml]: template.yaml
- Select an index or enter the stage 1’s configuration name (as provided during the bootstrapping): 1
- What is the sam application stack name for stage 1? [sam-app]: fcj-book-store-backend-dev
- Select an index or enter the stage 2’s configuration name (as provided during the bootstrapping): 1
- What is the sam application stack name for stage 2? [sam-app]: fcj-book-store-backend-dev
What is the Git provider?
        1 - Bitbucket
        2 - CodeCommit
        3 - GitHub
        4 - GitHubEnterpriseServer
Choice []: 2
What is the CodeCommit repository name?: fcj-book-store-backend
What is the Git branch used for production deployments? [main]: main
What is the template file path? [template.yaml]: template.yaml
We use the stage configuration name to automatically retrieve the bootstrapped resources created when you ran `sam pipeline bootstrap`.

Here are the stage configuration names detected in .aws-sam/pipeline/pipelineconfig.toml:
        1 - dev
Select an index or enter the stage 1's configuration name (as provided during the bootstrapping): 1
What is the sam application stack name for stage 1? [sam-app]: fcj-book-store-backend-dev
Stage 1 configured successfully, configuring stage 2.

Here are the stage configuration names detected in .aws-sam/pipeline/pipelineconfig.toml:
        1 - dev
Select an index or enter the stage 2's configuration name (as provided during the bootstrapping): 1
What is the sam application stack name for stage 2? [sam-app]: fcj-book-store-backend-dev
Stage 2 configured successfully.
To deploy this template and connect to the main git branch, run this against the leading account:
`sam deploy -t codepipeline.yaml --stack-name <stack-name> --capabilities=CAPABILITY_IAM`.
SUMMARY
We will generate a pipeline config file based on the following information:
        What is the Git provider?: CodeCommit
        What is the CodeCommit repository name?: fcj-book-store-backend
        …………………
        What is the ECR repository URI for stage 2?:
        What is the AWS region for stage 2?: ap-southeast-1
Successfully created the pipeline configuration file(s):
        - codepipeline.yaml
        - assume-role.sh
        - pipeline/buildspec_unit_test.yml
        - pipeline/buildspec_build_package.yml
        - pipeline/buildspec_integration_test.yml
        - pipeline/buildspec_feature.yml
        - pipeline/buildspec_deploy.yml
- Sau khi hoàn thành, SAM project có cấu trúc như sau
└── fcjdmssam
    ├── codepipeline.yaml       # (new) CodePipeline CloudFormation template
    ├── assume-role.sh          # (new) Helper script for CodePipeline
    ├── pipeline/               # (new) Build Specs for CodeBuild
    ├── events
    ├── fcj-book-store/         # SAM application root
    ├── README.md
    └── template.yaml           # SAM template
Triển khai mẫu CloudFormation pipeline
- Chạy các câu lệnh sau để tải những thư mục và tệp mới được tạo lên CodeCommit repository
git add .
git commit -m "Adding SAM CI/CD Pipeline definition"
git push
- Sau đó, triển khai SAM Pipelines bằng câu lệnh sau:
sam deploy -t codepipeline.yaml --stack-name fcjdms-backend-pipeline --capabilities=CAPABILITY_IAM
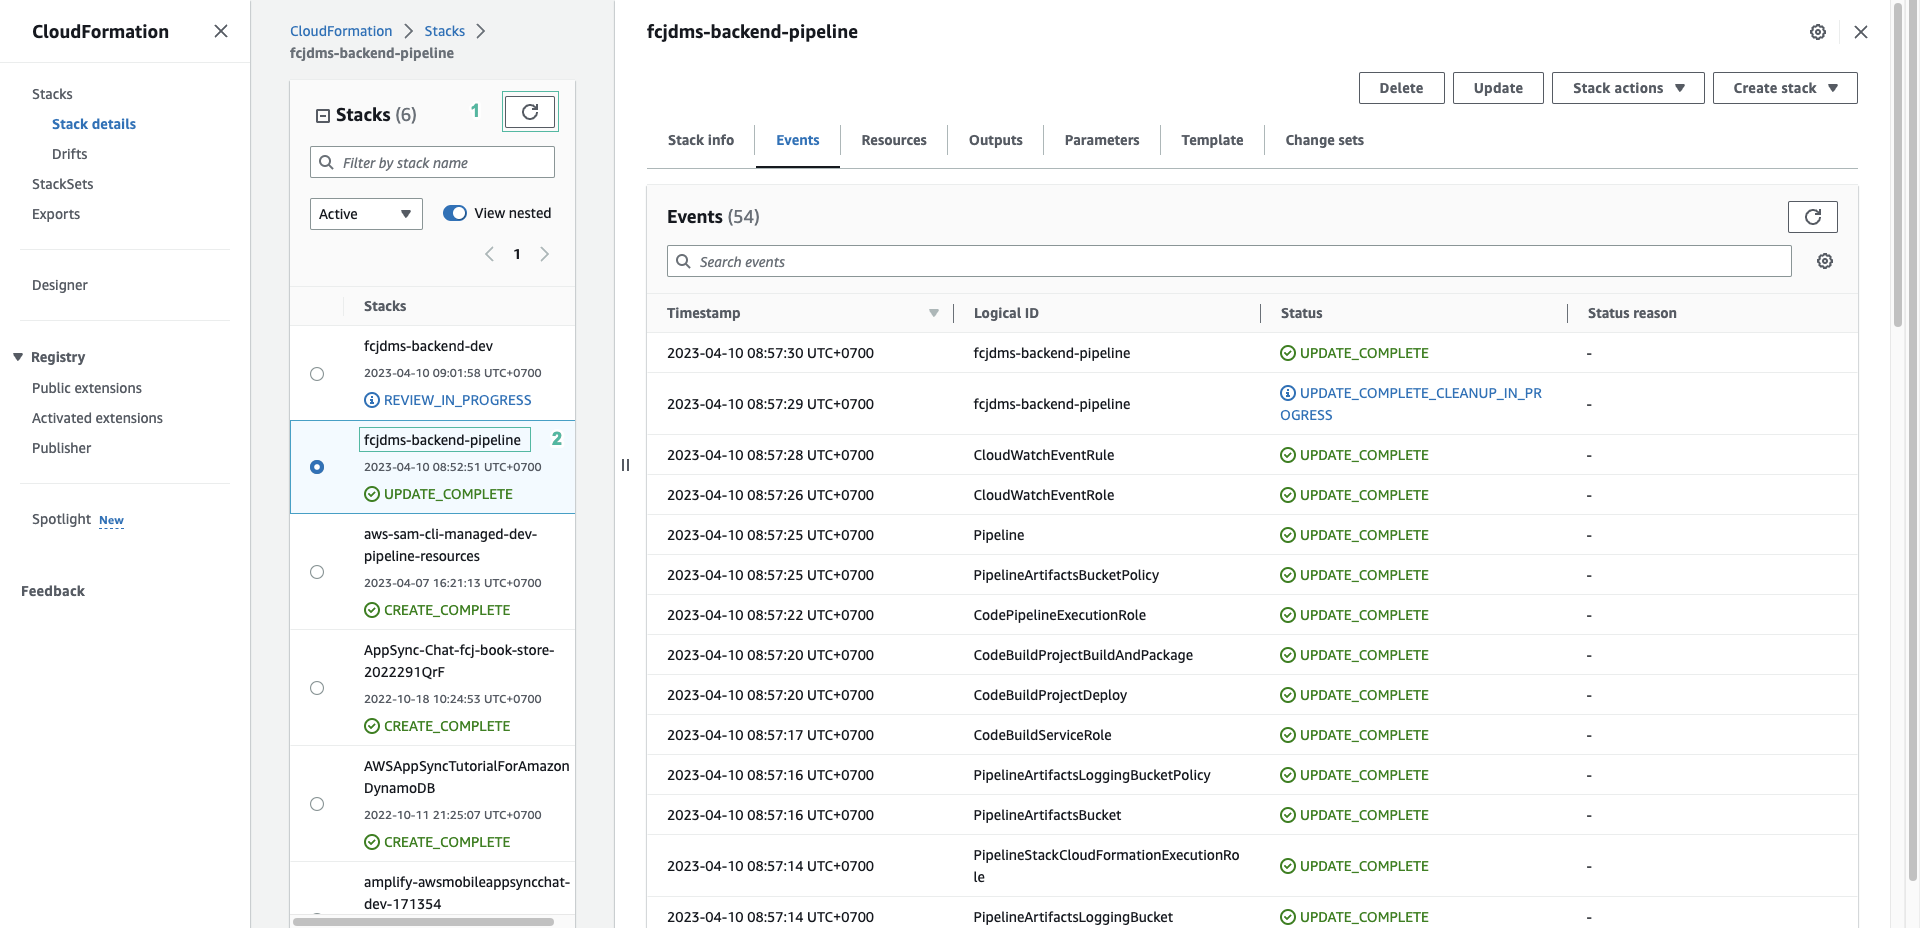
- Đợi một lúc, trở lại với bảng điều khiển của CloudFormation để kiểm tra
- Tải lại danh sách stack
- Ấn chọn fcj-book-store-backend
- Mở lại bảng điều khiển của CodeCommit, chọn Pipeline • CodePipeline và chọn Pipelines. Bạn sẽ thấy một pipeline đang được xử lý
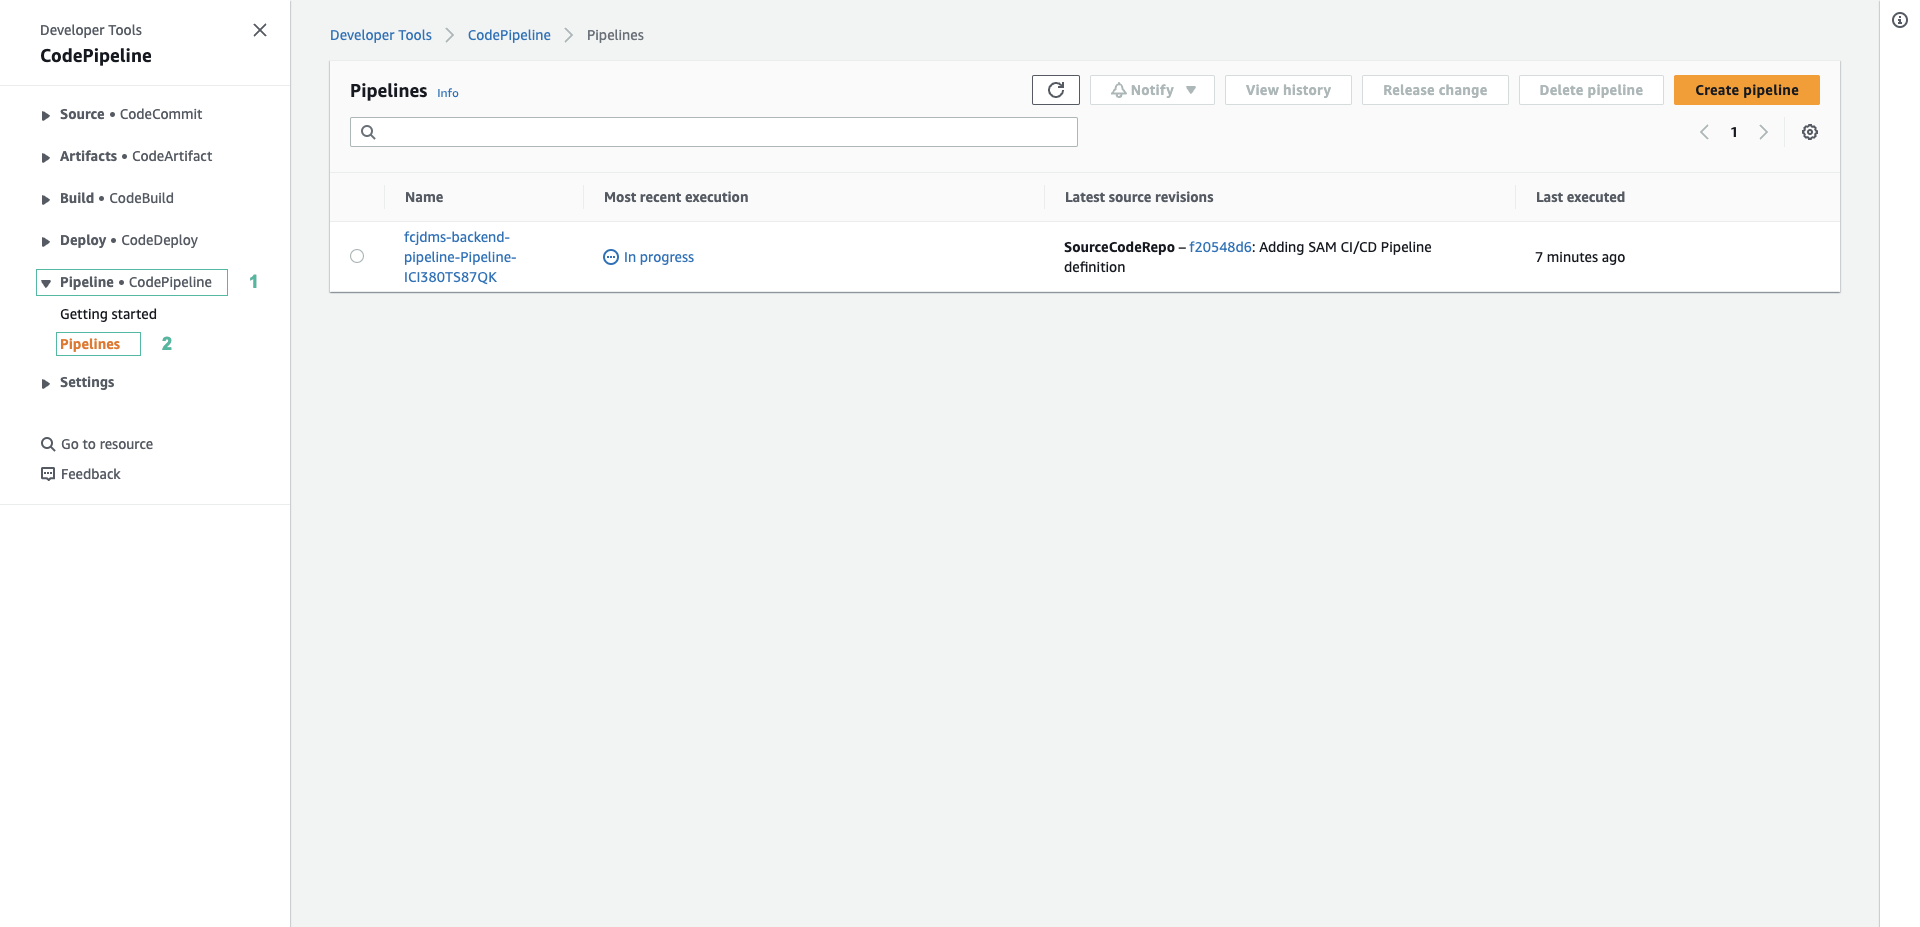
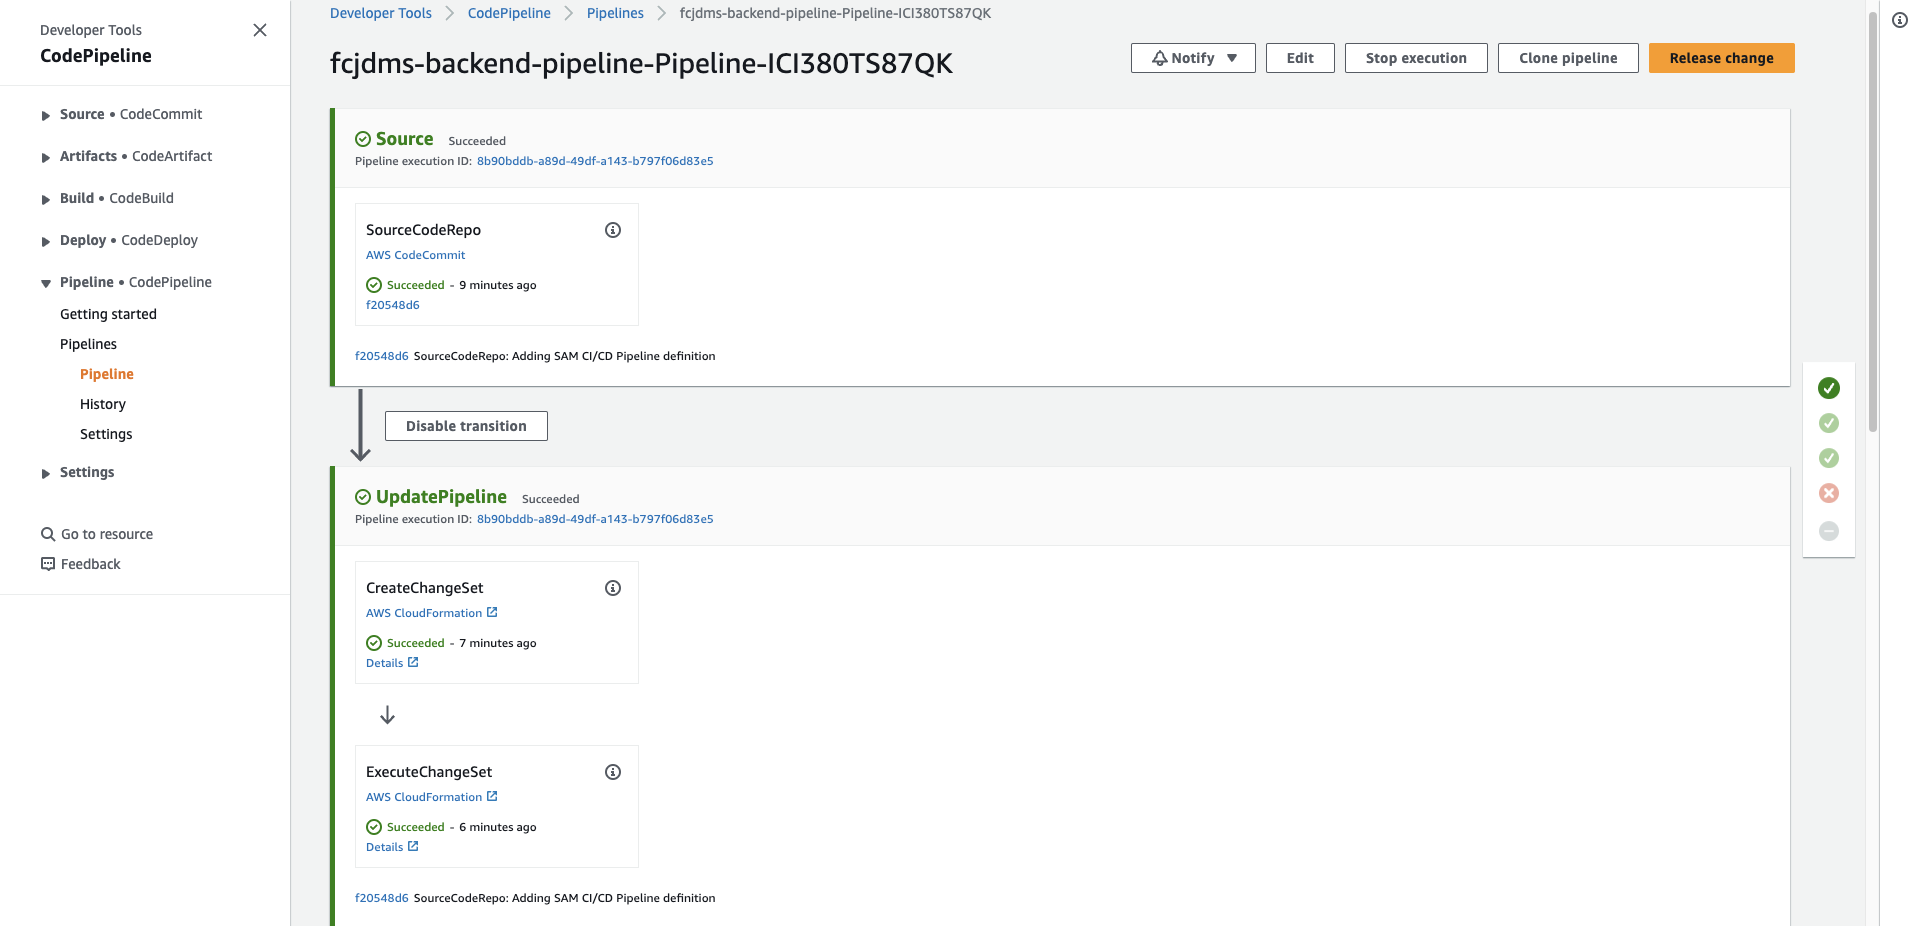
- Đợi một lúc để xử lý pipeline hoàn thành. Ấn chọn fcjdms-backend-pipeline-…
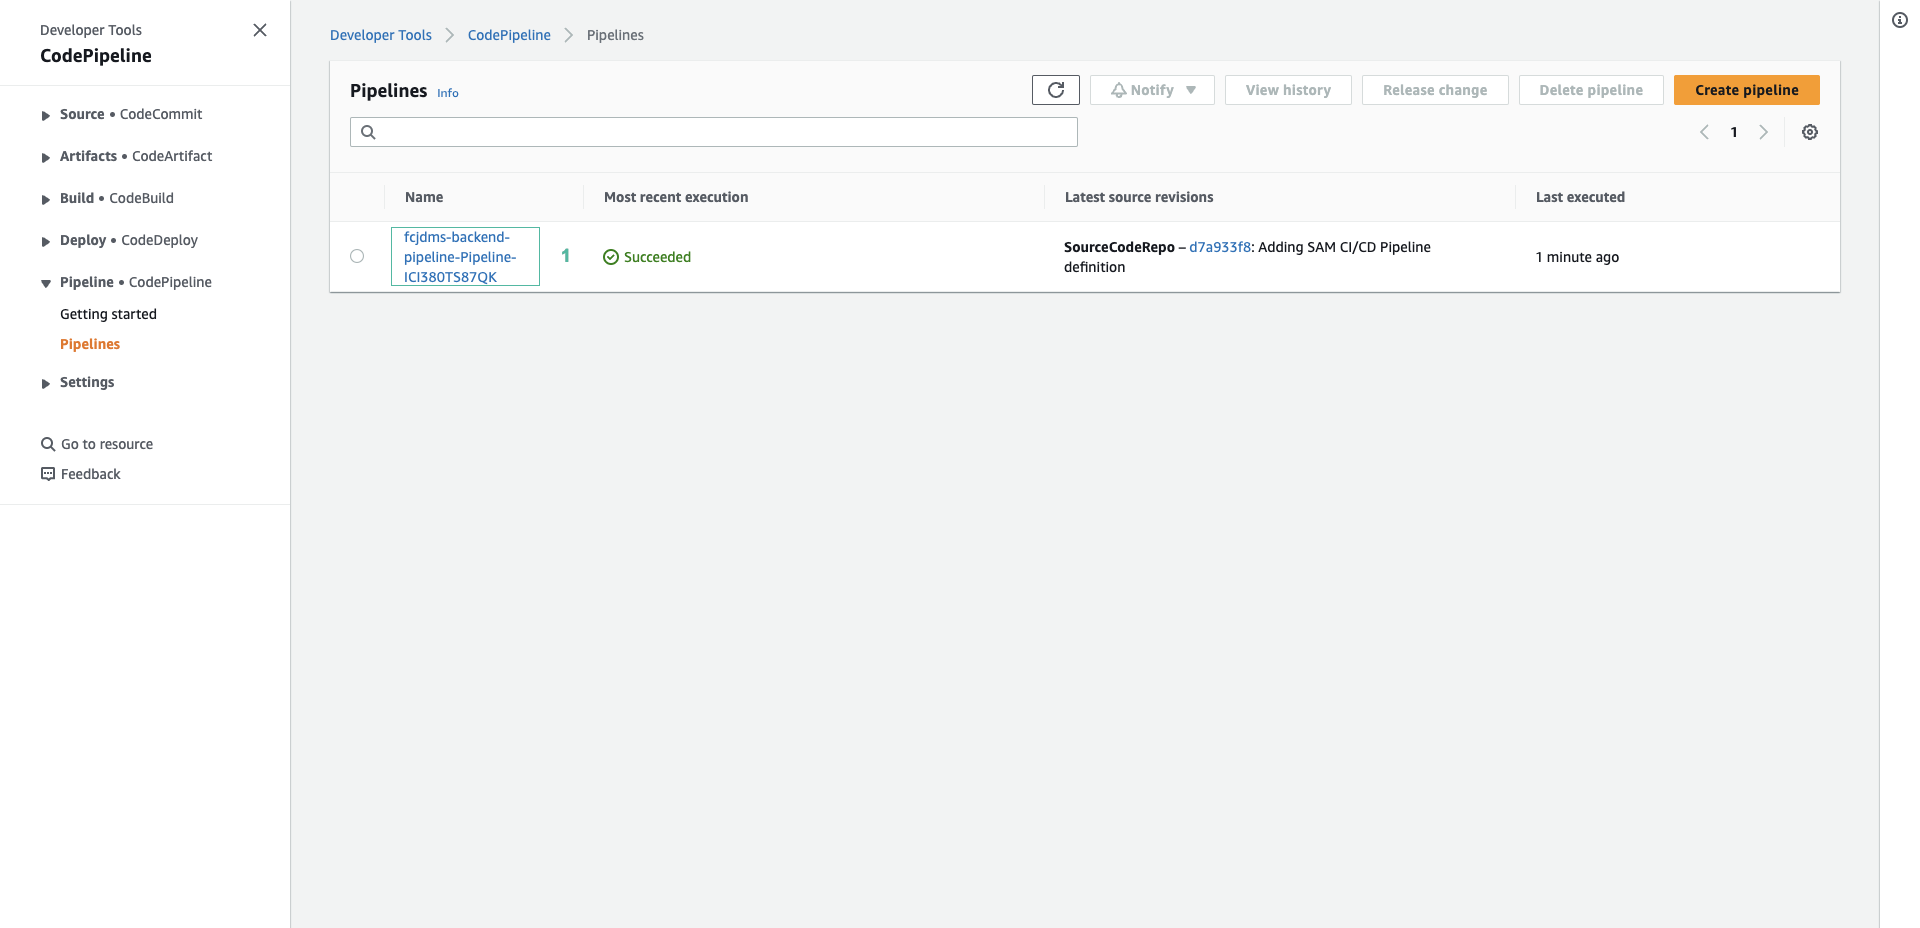
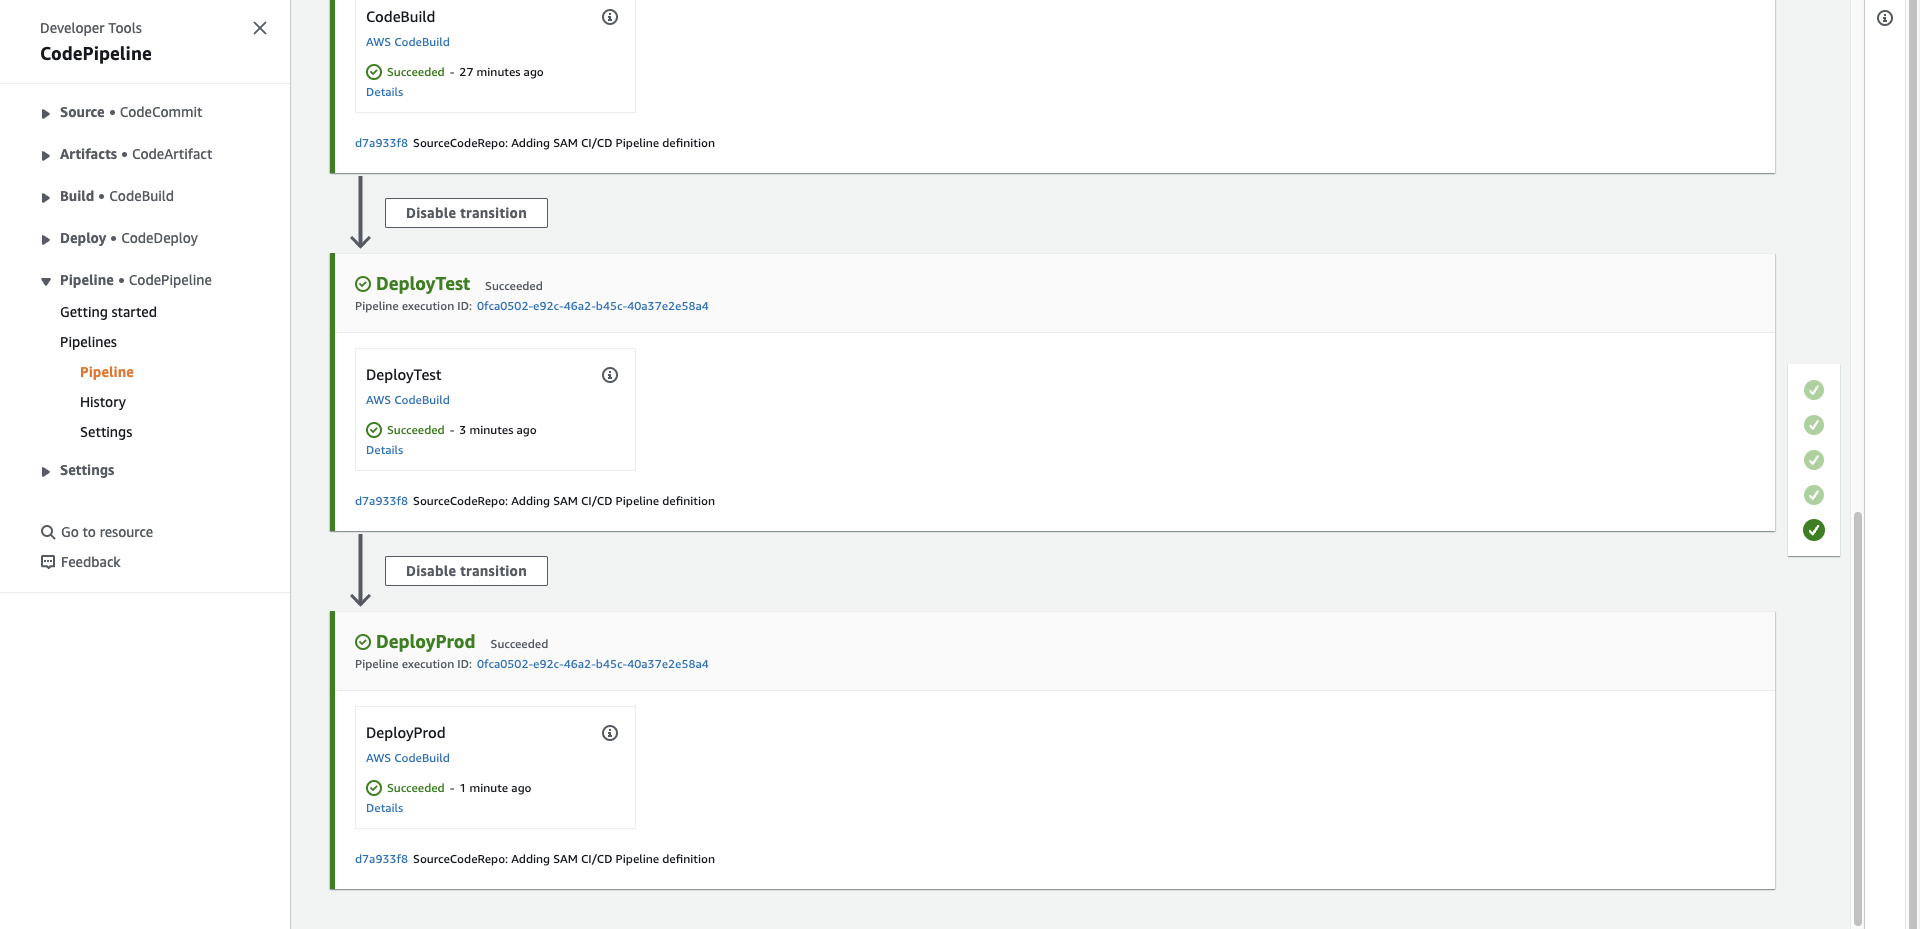
- Bạn sẽ thấy tất cả stage đã thành công
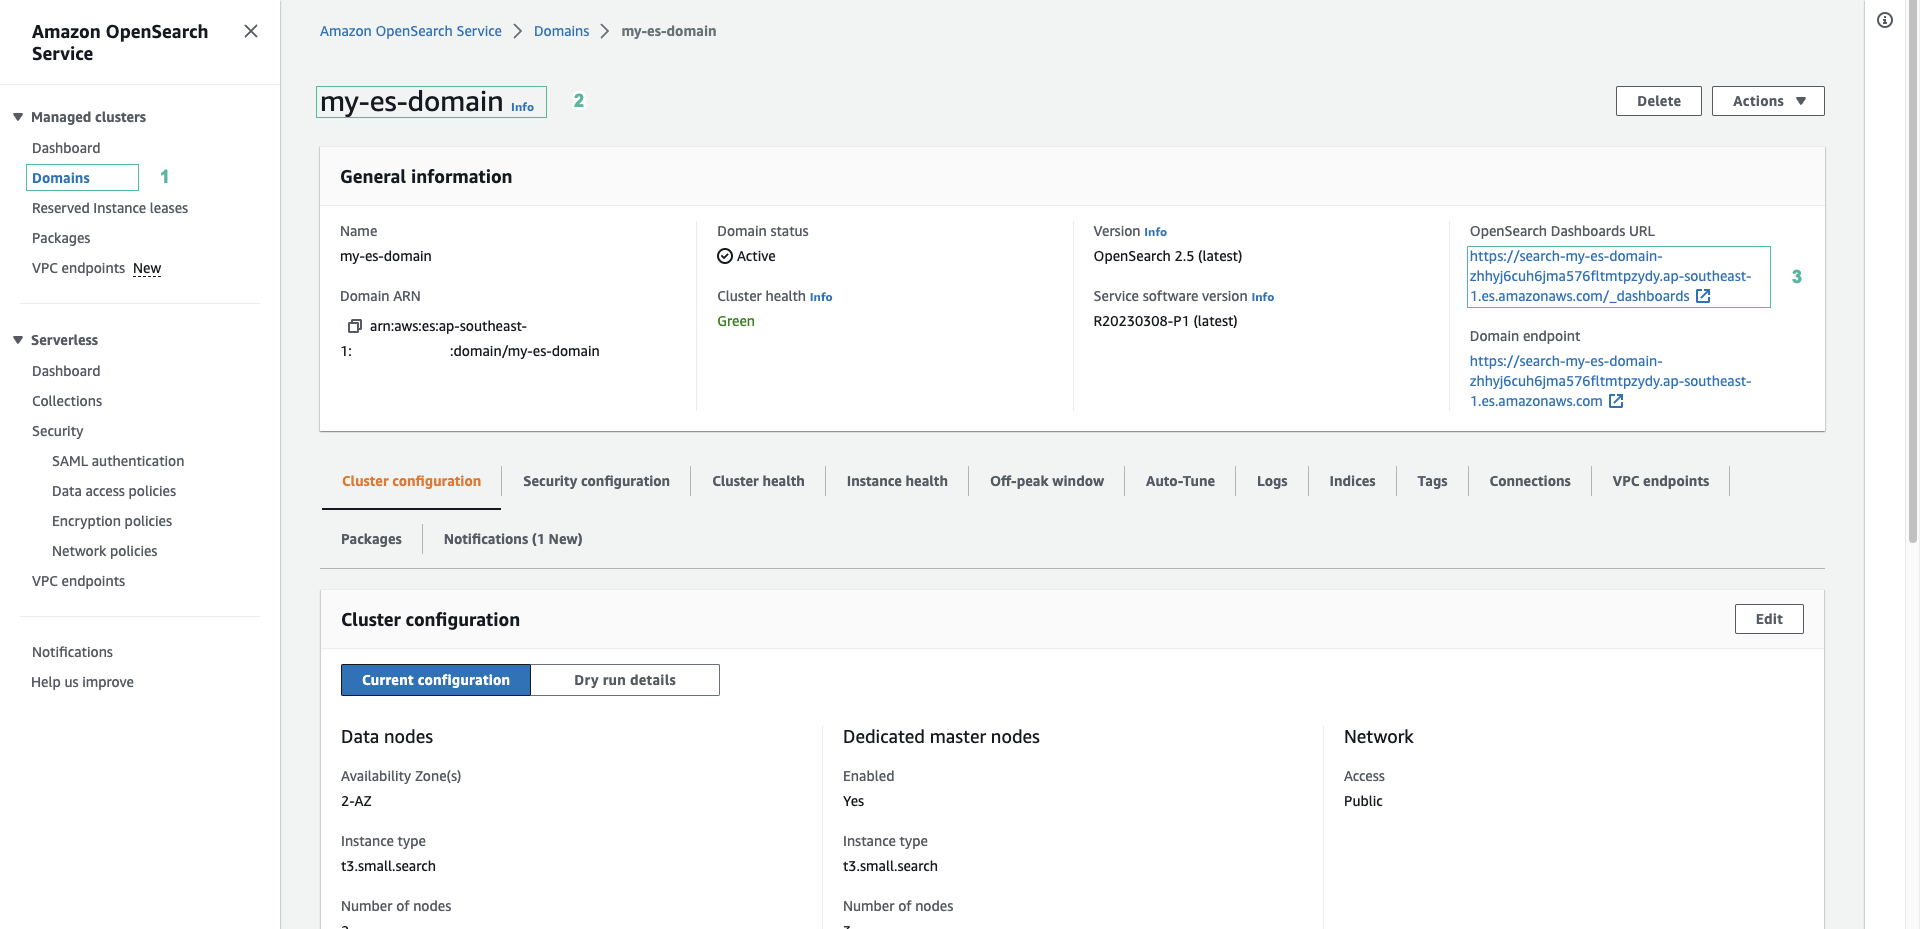
- Mở bảng điều khiển của Amazon OpenSearch Service
- Chọn Domains ở menu phía bên trái
- Chọn my-es-domain
- Ấn vào URL của OpenSearch Dashboards
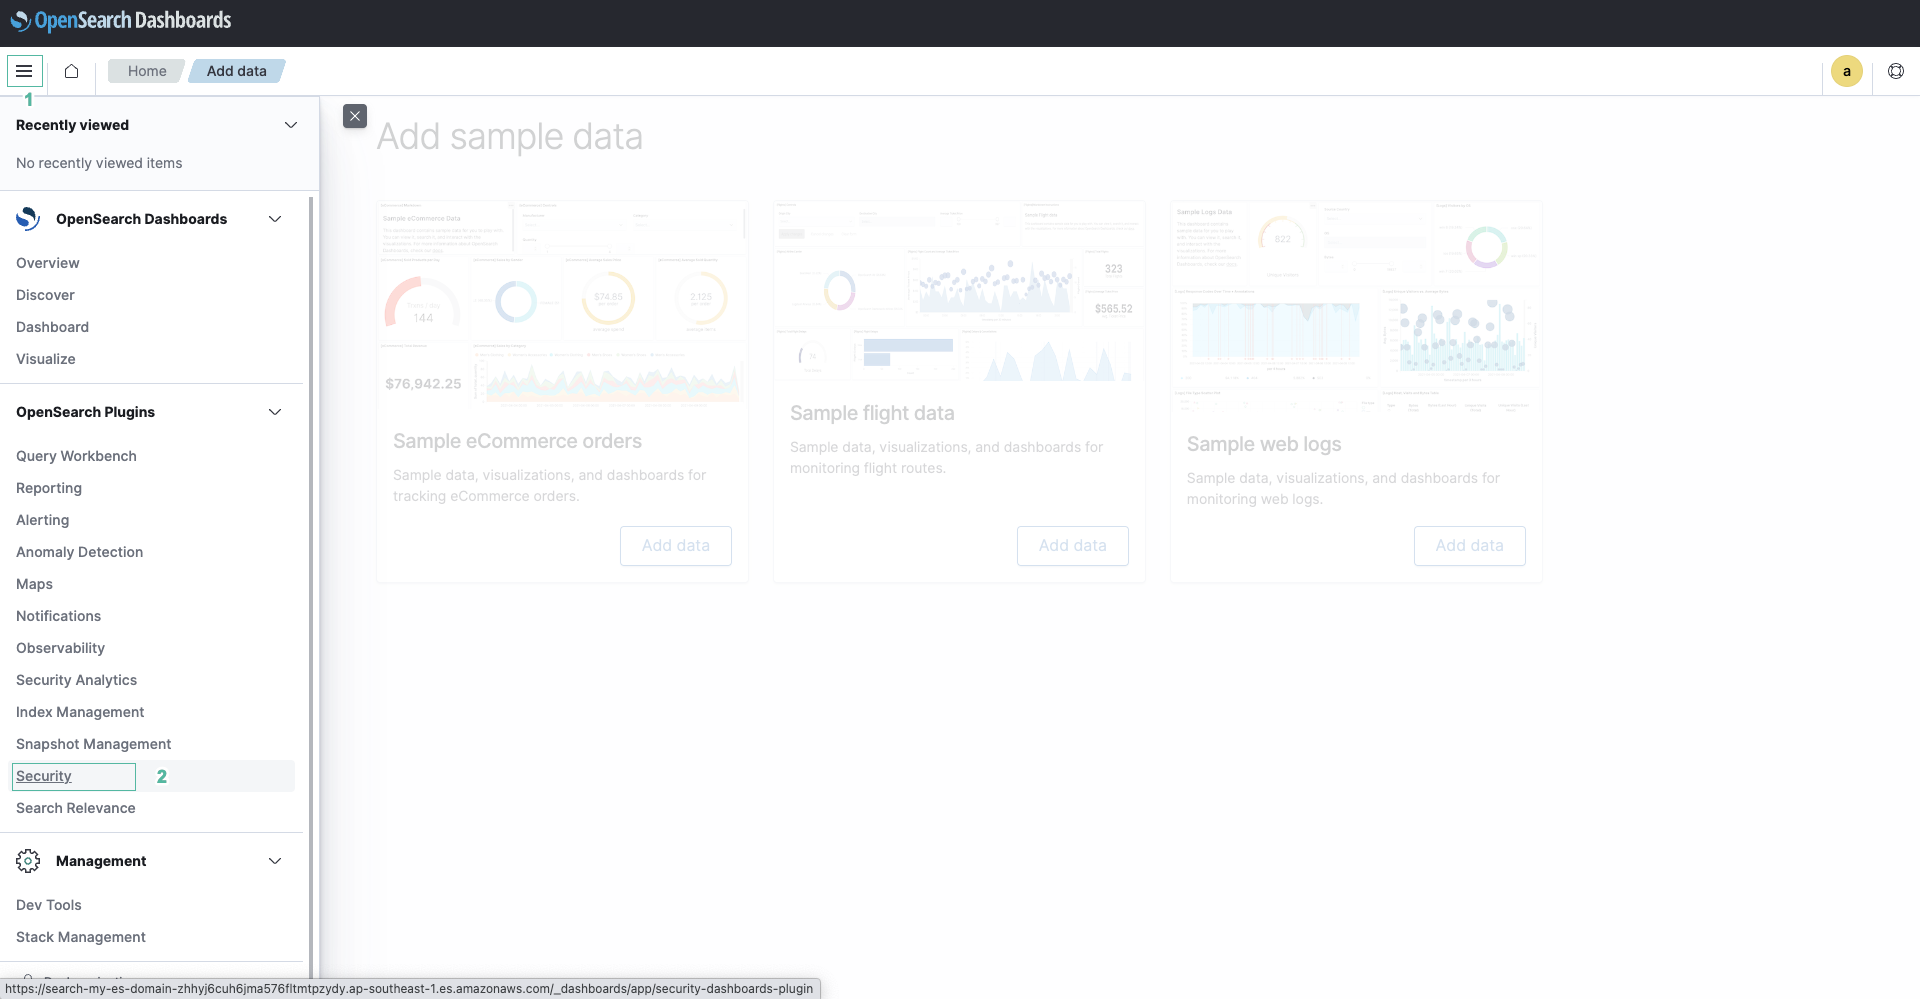
- Đăng nhập vào Dashboard với tài khoản:
- Tên người dùng:
admin - Mật khẩu:
Admin1234@
- Mở menu và chọn Security
- Chọn Roles ở menu phía bên trái, sau đó chọn all_access
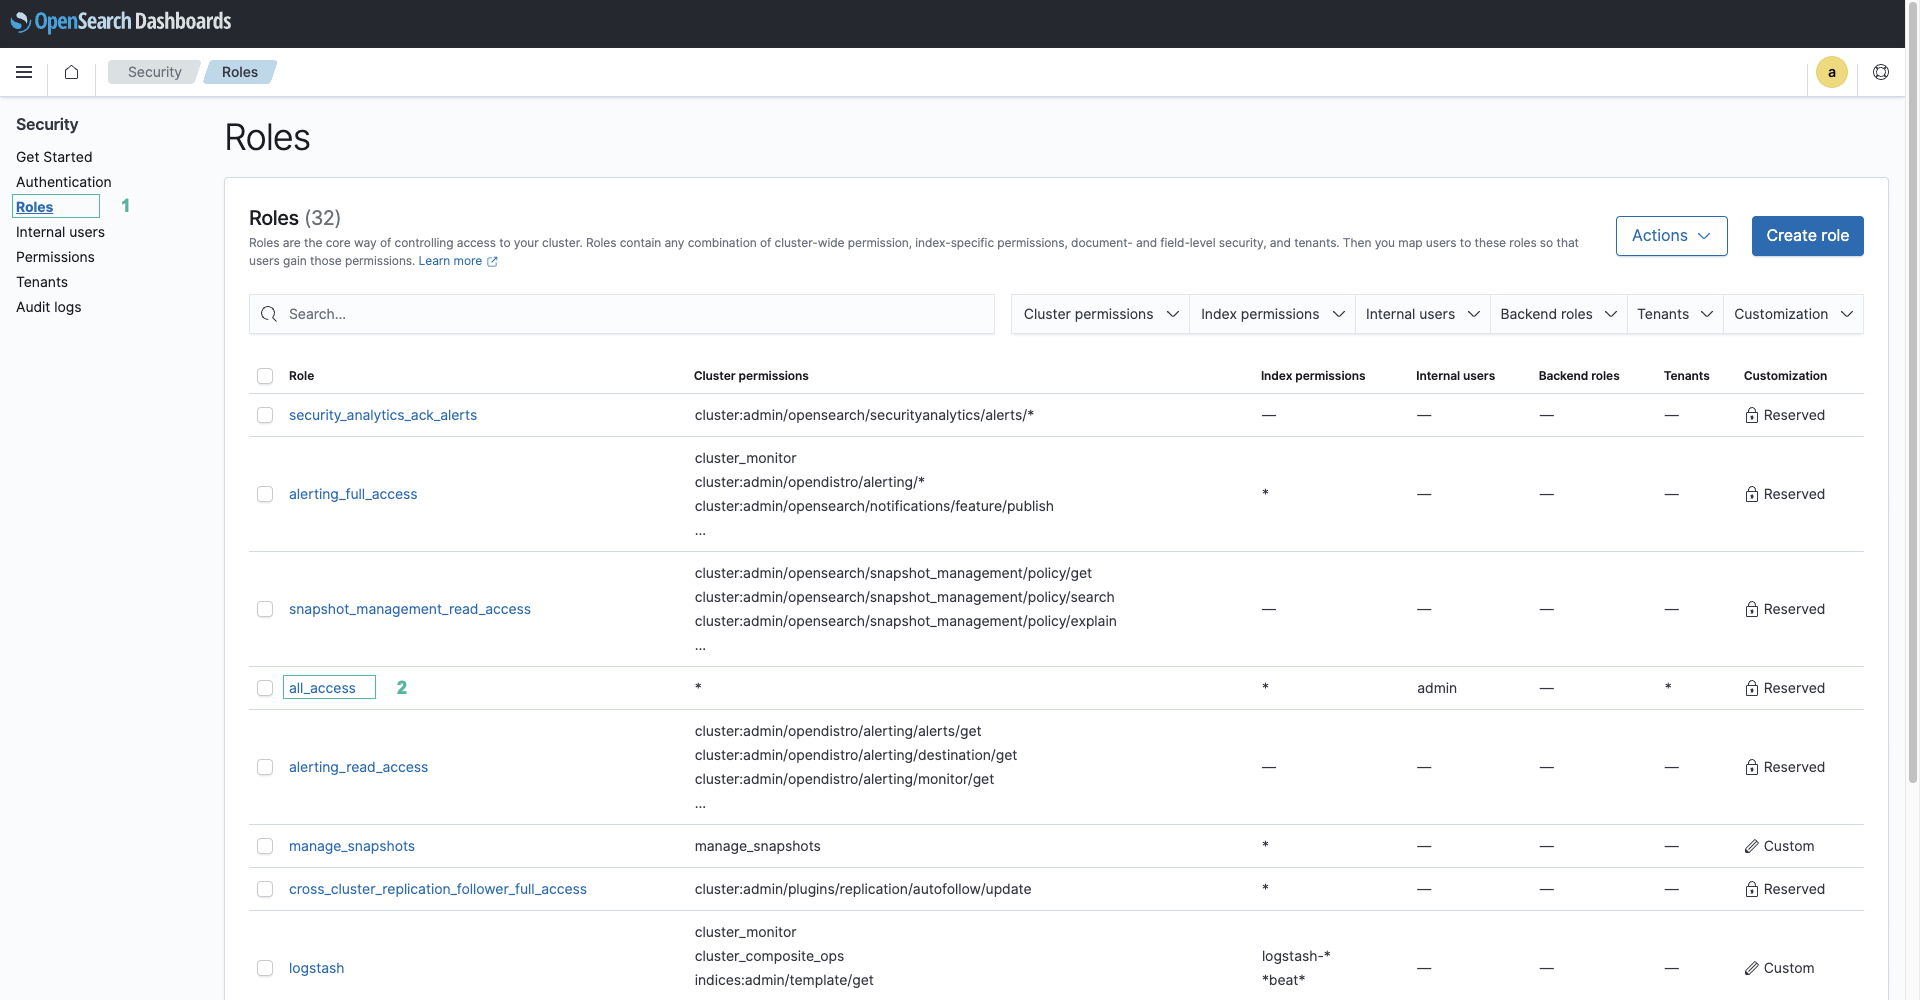
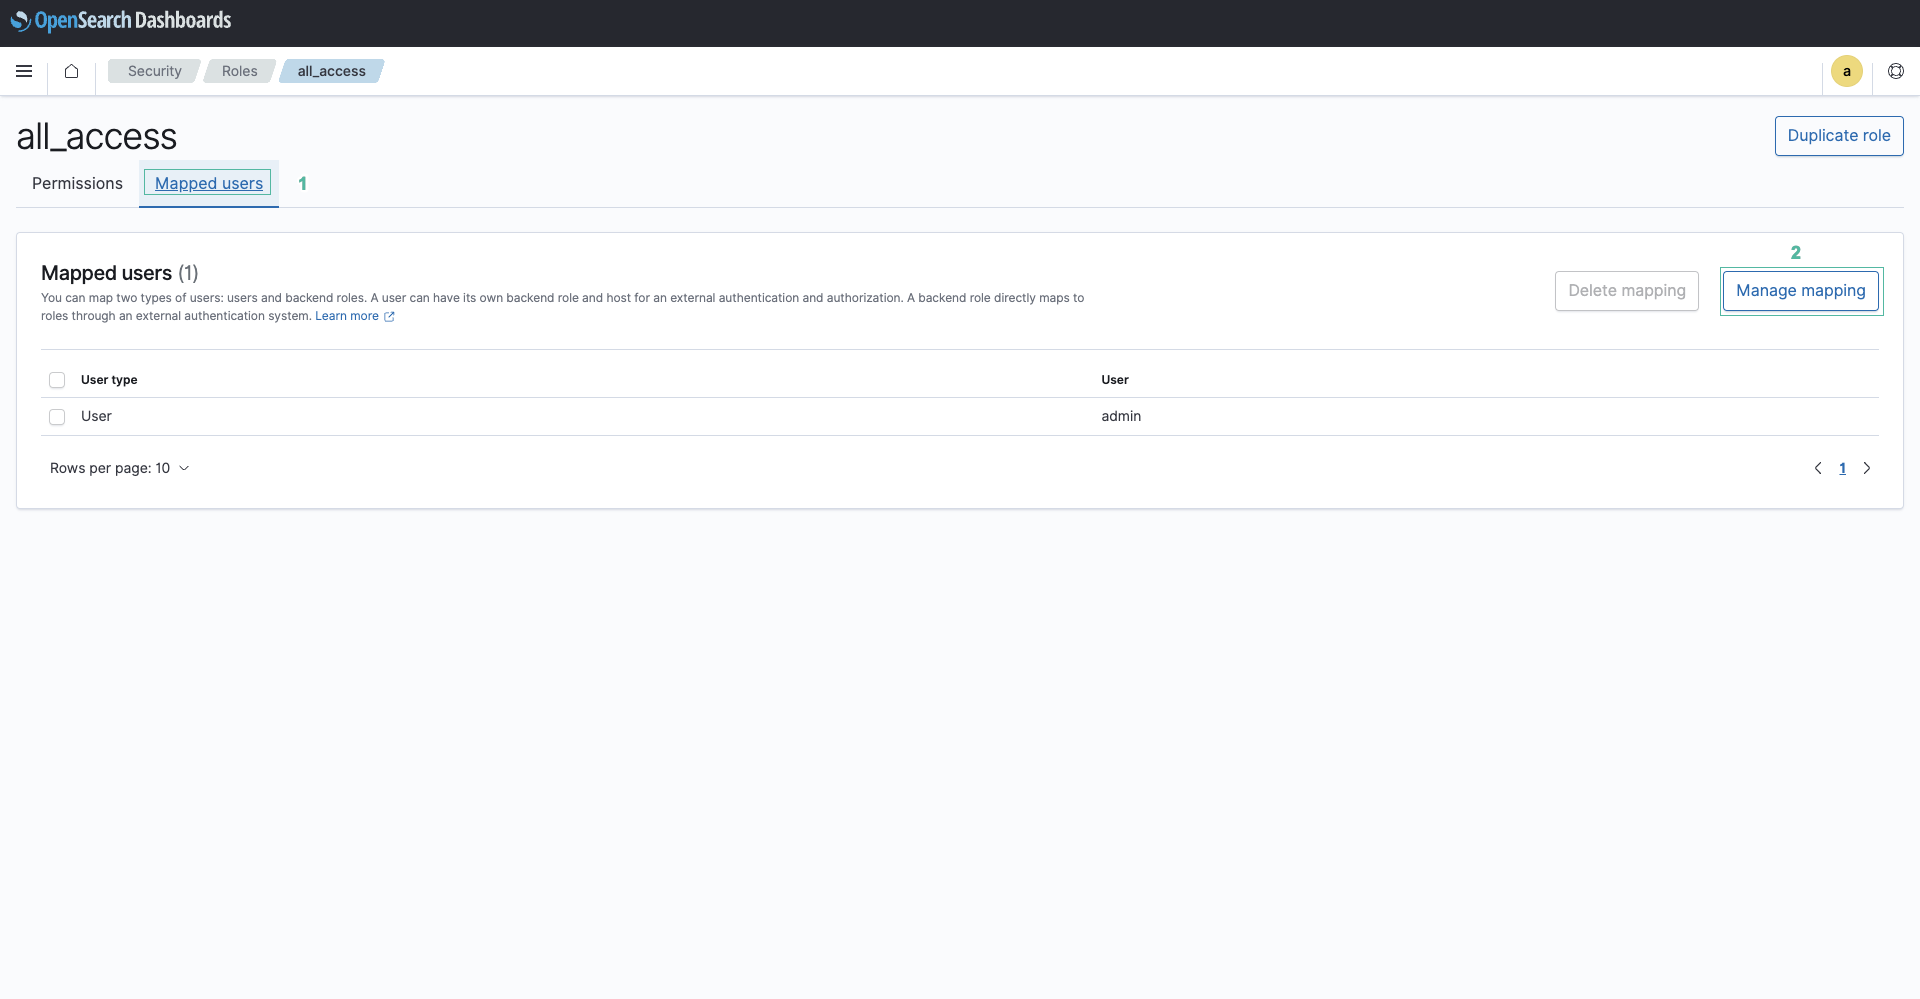
- Chọn tab Mapped users và ấn Manage mapping để mapping role của các hàm Lambda với người dùng.
- Mở bảng điều khiển của hàm search_docs.
- Sau đó chọn tab Configuration
- Chọn Permissions ở menu phía bên trái
- Ấn chọn role mà hàm đang thực thi
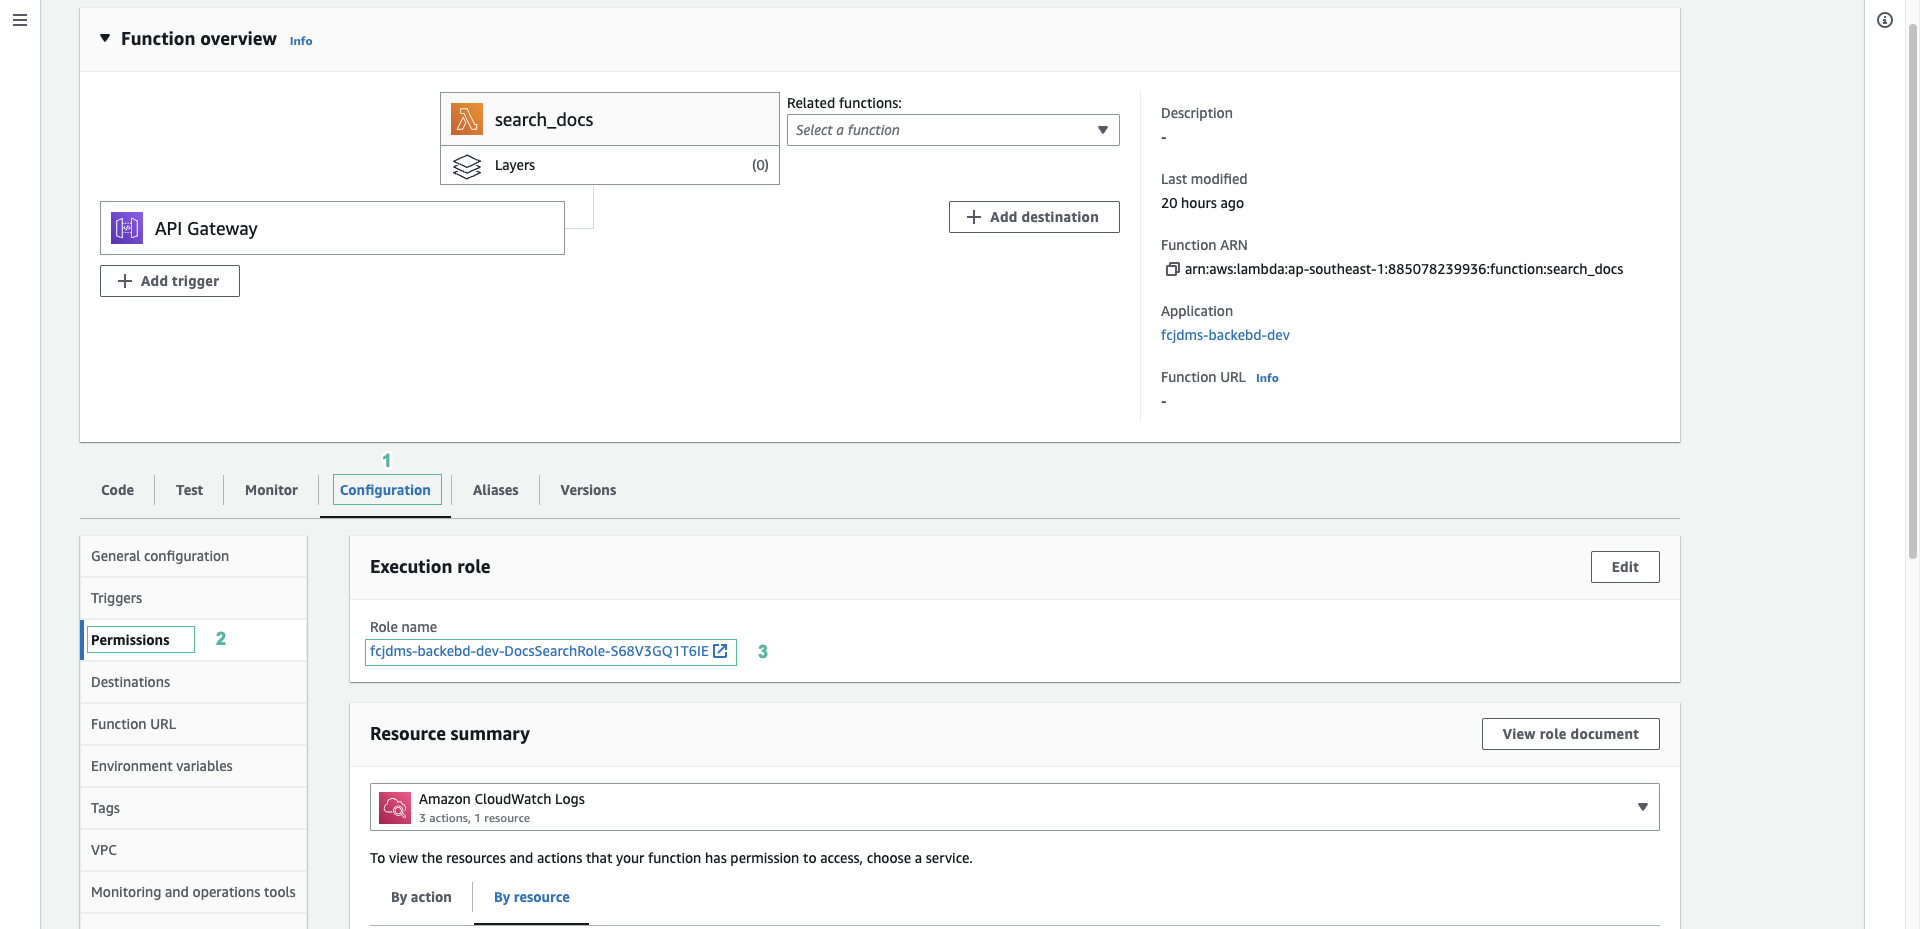
- Sao chép arn của role

- Làm tương tự để lấy arn role của hàm load_stream_data
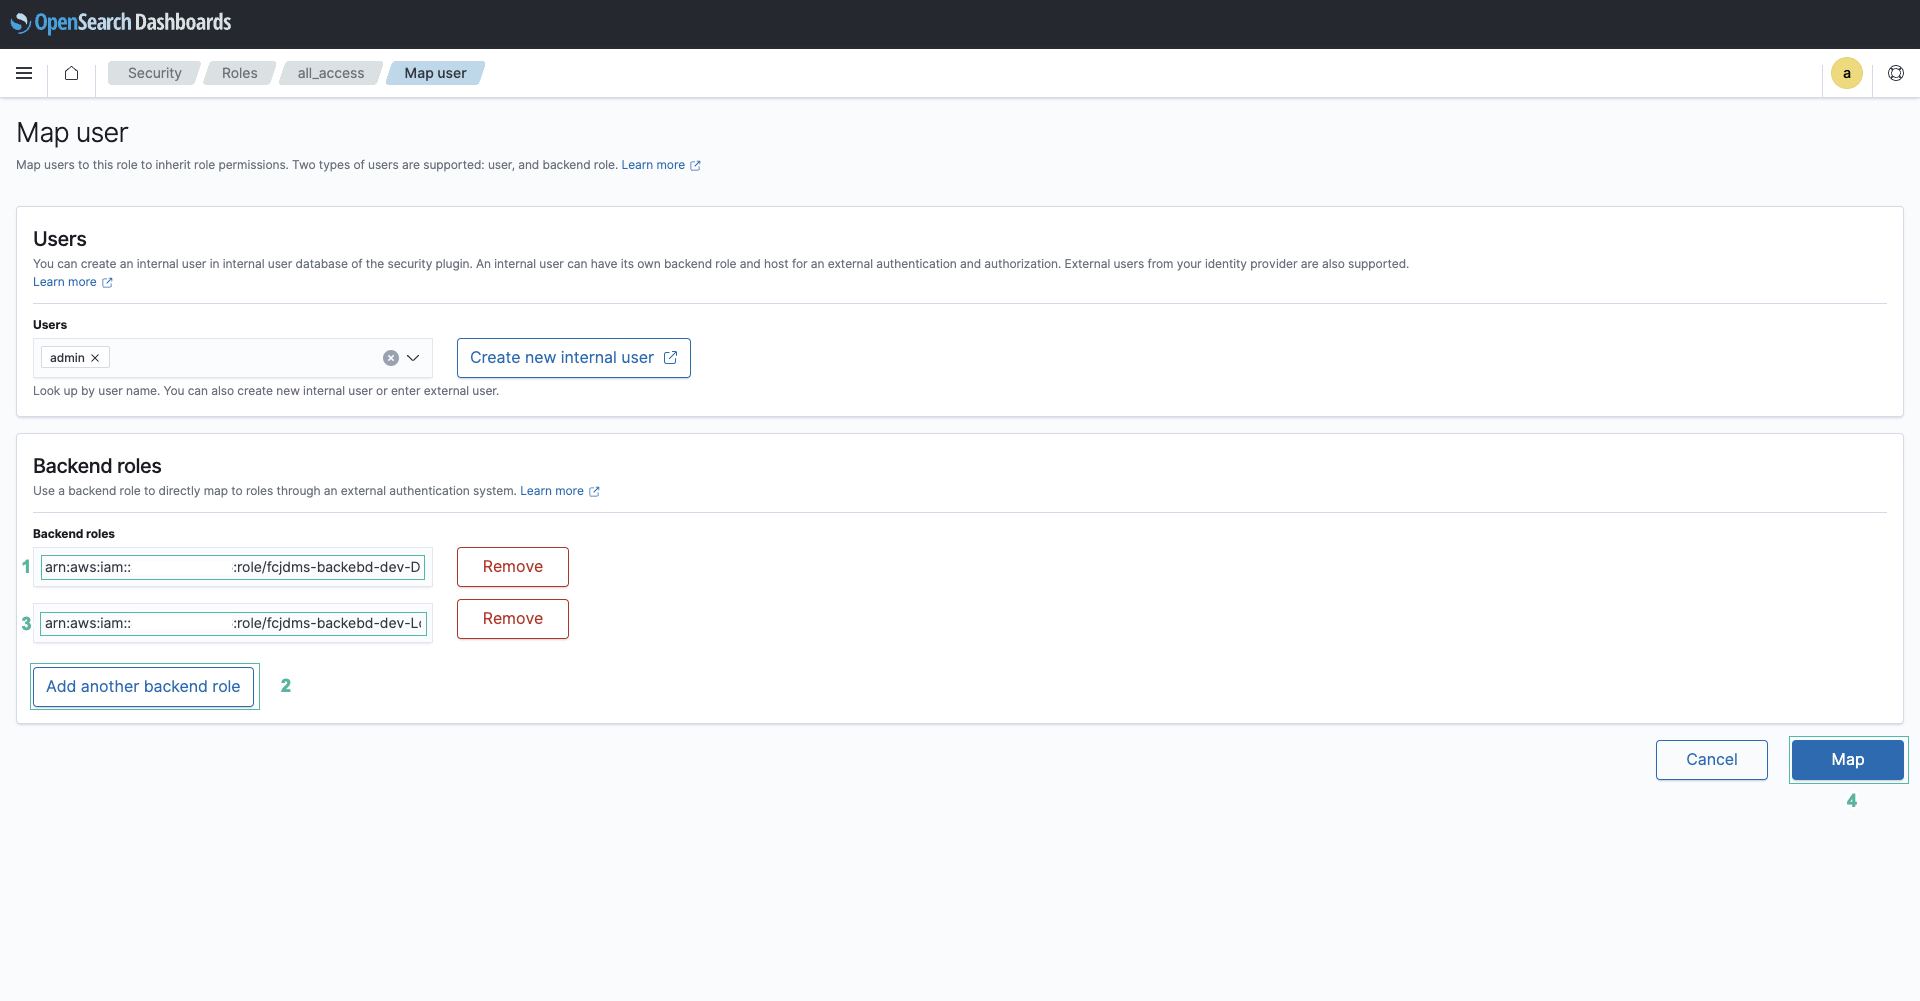
- Dán các ARN vào phần Backend roles bên OpenSearch Dashboard. Sau đó ấn Map.
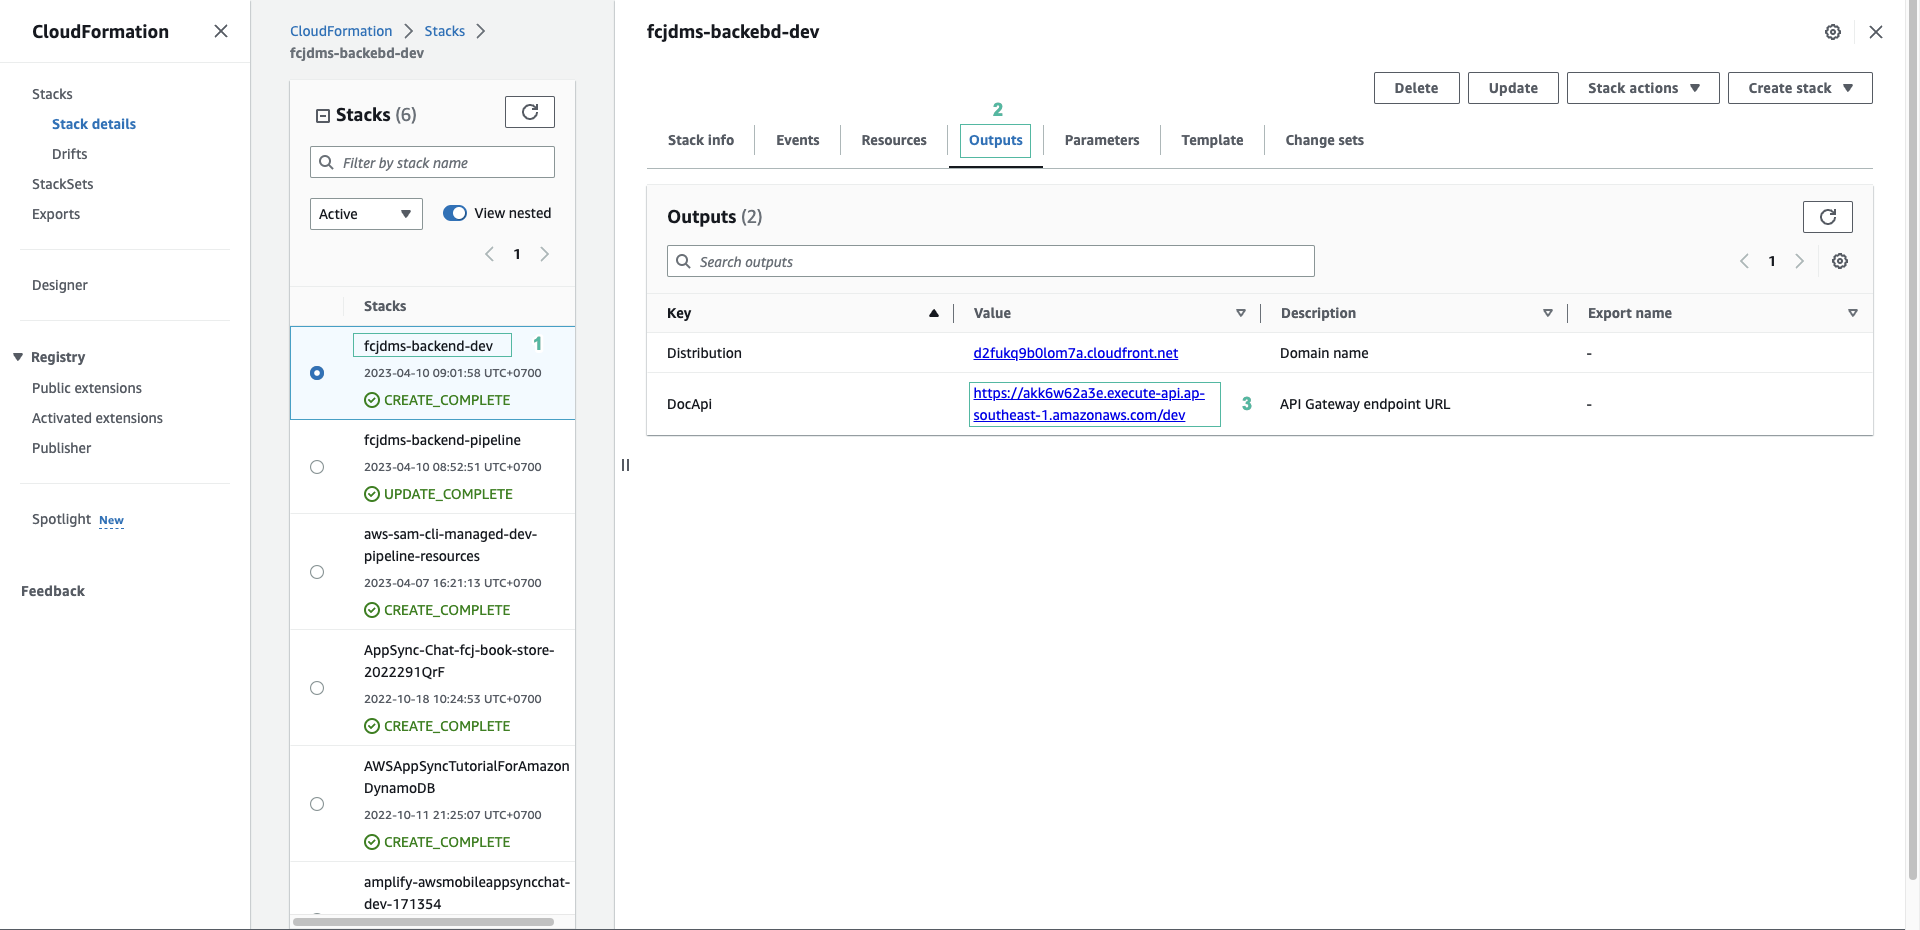
- Quay lại với bảng điều khiển của CloudFormation.
- Chọn stack fcjdm-backend-dev.
- Ấn tab Outputs và ghi lại URL của API
Vậy là chúng ta đã triển khai thành công SAM Pipeline và mapping role của hàm trong Lambda với người dùng của OpenSearch domain. Bước tiếp theo chúng ta sẽ triển khi pipeline cho phần front-end của ứng dụng web.